We've been doing a lot of "putting up" around the farm lately. One of the most exciting things we've put up was actually invented by our neighbor up the road, Frank Cardopoli. Frank, who has a great deal of experience in both farming and business, has designed a device that makes the lives of chickens and their owners much more pleasant, particularly during the hot, dry days of summer. Called "The Chicken Fountain," it provides fresh, clean water to a flock 24/7--no more daily emptying, filling, or cleaning out that icky, slimy stuff that seems to collect constantly inside conventional chicken waterers.
Frank was kind enough to donate one of his Fountains to our farm, and even came (with his daughter, two sons, and niece) to help us install it. Now that's my kind of neighbor! Below is the story of The Chicken Fountain, as told by Frank on the product's website,
www.chickenfountain.com (where you can find more detailed information about the Fountain and how to purchase one for yourself!).
 I love having backyard chickens but hated the task of cleaning the water bowls and refilling them. Vacations were hard to plan because finding people that were available to keep the chickens watered was not easy. Summers were the worst because the chickens needed more water and the water in the dish would evaporated more quickly due to the heat. Not to mention how unhealthy it was for our dogs, goats and other farm animals to drink the water that was full of bird droppings! I set my mind to build a system that was easy to install, provided a constant flow of clean water, and was completely maintenance free. I spent many nights in the barn working on this concept and, quite frankly, failed a number of times. Then it hit me! Why not just make a passive flow unit that could be hooked up to the garden hose?? There wouldn't be pressure regulators to fail, no start up high pressure, no manually refilling buckets...Just cool, clean water every time the chickens went to drink. I finally perfected the unit and felt so strongly about it that I wanted to make it available to every flock owner that hates cleaning the mess of dirty, unhealthy water dishes.

Our growing flock is not only now happily hydrated, but also newly protected. For among the other things we've put up at the farm lately are a secure chicken run (off the coop) and extra electric wiring (on the barnyard fence). We weren't expecting to have to make these improvements--that is, until a fox came along a few months ago and started picking off our laying hens. If you've been reading this blog for a while, you might recall the first couple of fox attacks we endured. At that point, we suspected that a coyote might the culprit, but as our diner became more and more bold, s/he began showing up all hours of the day, standing on the other side of the barnyard fence and peering in, just waiting for our hens (who were now being locked in the coop most of the time, poor dears) to show their delectable selves. If we ever did make the mistake of leaving the hens out while we popped back into the house for lunch or a rest, we were likely to regret it. Altogether, we lost 14 hens.


As lovely as the girls and I consider foxes to be, and as happy we are that beings wild and wooly still wander the forests near our home, this was not a tolerable situation. To the rescue came another helpful neighbor, Tom Tevepaugh. He suggested that we call an acquaintance of his, J.R. Troyer, to ask if he could build a run for the hens and reinforce our fencing at a reasonable cost. J.R. came out almost immediately, talked with us about what we wanted, gave us a good price for the work we agreed upon, and returned within a few days, bringing with him his assistant, Moses. They worked hard and did a beautiful job. G-P added still more security by extending the extra wires J.R. and Moses along strung along the top of the barnyard fence to cover all of its 5 gates. And now not only are our laying hens again happily roaming freely, but we have also been able to let the young chickens (now 10 weeks old) out to free-range as well. What a relief it is to have our tranquilly lively, cluck-cluck-clucky barnyard back.

While the guys were out building and wiring, the girls and I were doing some belated "spring cleaning" in the barn. The stall where the young chickens have been for 6 weeks or so now had gotten pretty rank, and the heat of the summer had turned the place into quite an odoriferous nightmare. The same goes for the goat and donkey stalls. So out went the old, nasty wood chips and hay, and in came nice, fresh bedding. Walls, water buckets, and feeders also got scrubbed down. The blisters and sore muscles I gained from all the shoveling, hauling and scrubbing were made well worthwhile by that nothing-so-sweet (and nothing-so-short-lived!) smell of fresh barn stalls. Mmmmm.


I've also been spending quite a bit of time "putting by." So far this summer, I've made several batches of strawberry jam, a couple of batches of blackberry jam, and for the first time ever, blueberry jam. In each case, the girls and I have been fortunate to find organically grown (or in the case of the blackberries, wild) berries to pick right here in the Davidson area. (In addition to the jam, the blueberries contributed to some wonderful muffins; you can find the recipe for them below.) We've also been blessed with LOTS of cucumbers from our garden. So I have canned three different kinds of pickles: spicy kosher dill, garlic dill, and bread and butter. The bush beans also did well this year, so several packets of those went into the freezer. Next week I hope to start canning tomatoes, marinara sauce, and maybe some homemade ketchup. These will be new adventures for me, so I'm sure there are some surprises ahead. (Hopefully none of them will be quite as trying as when I completely botched the water bath for one batch of pickles, had a jar break into a billion bits in the middle of the next run, and--during the final effort of the day--had a lid go magically floating off another jar, once again mucking up the entire water bath with its contents! I was not a happy canner.)


The herbs have also done pretty well this summer--especially the basil! It's been just lovely. In fact, I've discovered a new summer pleasure: making basil bouquets. As aromatic as they are lovely, they compliment a table set with garden-fresh food like nothing else. I have made lots of pesto, as well as some basil sauce (without the nuts and cheese). I store these sauces by dividing each freshly made batch into ice cube trays and then freezing them. I store the frozen cubes in resealable plastic bags and then can use just as many as I need (and it rarely takes very many) to finish a veggie, fish or pasta dish during the months when fresh herbs are hard (or expensive) to come by.


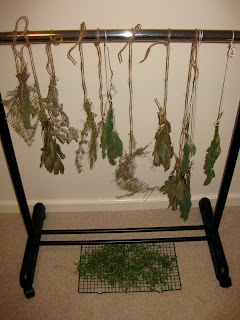
The oregano, thyme and dill have yielded generously, as well, and the rosemary has done fairly well. Besides using all of these now to flavor our summer dishes, I have started drying them in a storage closet upstairs, along with some sage and extra thyme from yet another kind neighbor. Drying herbs yourself is ridiculously easy to do, and the result is much tastier (and certainly cheaper!) than the stuff you'll get from the baking aisle of the grocery store. To do it, just clip your herbs with a good bit of stem (or buy them this way at your local farmers market). Gently rinse off any dirt that may be hiding in the leaves and then air dry them on a towel. Once they are no longer damp, gather the stems into several small bunches and tie them at the bottom, using a foot or so of twine or string. Take these to a dark, dry, low-traffic room in your house and hang them upside down for a week or two, until the leaves feel dry and crumbly when you touch them. (Making sure there is no moisture left in the leaves will ensure that they stay good during the coming months.) Remove the leaves from the stem and crush them as finely as you like. Store them in small plastic bags or glass spice jars. Voila!--you've got the makings of delicious dishes for months to come.
Are their some things you especially enjoy "putting up" or "putting by" during the summer? If so, feel free to share them here. In the meantime, I leave you with recipes for a couple of the items I've mentioned above. Hope you enjoy!
(Adapted from www.epicurious.com. Original recipe written by Eleanor Topp and
Margaret Howard, published in The Complete Book of Year-Round Small-Batch Preserving.)

I doubled this recipe, and it worked fine. In some jars, I used small whole cucumbers, in some thick slices, and in others larger cucumbers cut lengthwise into spears. To a few of the jars, I added some crushed red pepper. You could also add a whole hot pepper to each jar, if you also like your pickles zesty. I hope to try that once the cayenne ripen!
Ingredients:
8-10 small pickling cucumbers (about 3 pounds)
2 cups white vinegar
2 cups water
2 tablespoons pickling salt
4 heads fresh dill or 4 teaspoons dill seeds
4 small cloves garlic
Directions:
1. Prepare a boiling water bath* and sterilize 4 pint jars in the bath. Leave them in the bath to stay warm. Immerse the the lids and bands in warm water.
2. Cut a thin slice from the ends of each cucumber
3. Meanwhile, combine vinegar, water, and salt in a saucepan and bring to a boil.
4. Remove hot jars from canner. Place 1 head fresh dill or 1 tsp dill seeds and 1 clove garlic into each jar. Pack in cucumbers. Pour boiling vinegar mixture over cucumbers to within 1/2 inch of rim (head space). Apply the lids and screw on the bands. Process 10 minutes for pint jars and 15 minutes for quart jars in the boiling water bath.
Yield: 4 pints
|
*You can find easy instructions on how to can using a boiling water bath at the Simply Canning website.
Blueberry Buttermilk Muffins
Ingredients:
2½ cups all-purpose flour
1½ teaspoons baking powder
½ teaspoon baking soda
¾ cup sugar
¼ teaspoon salt
2 large eggs, beaten
1 cup buttermilk
½ cup (1 stick) butter, melted and slightly
browned
1½ cups blueberries (preferably fresh, but frozen
are okay)
2-3 tablespoons sugar for sprinkling on top of
muffins (optional)
Directions:
Preheat oven to 400°. Grease (preferably with
butter) 24 muffin cups. Sift the dry ingredients together in a large bowl. In
another bowl, whisk the eggs, buttermilk and butter. Make a well in the dry
ingredients and pour in the liquid ingredients, mixing gently and quickly. Very
gently fold in the berries. (If using frozen berries, coat them in a tablespoon
or two of all-purpose flour before adding them. Shake off any excess flour.) Spoon the batter into the greased
muffin cups. If desired, sprinkle each muffin with a bit of sugar. Bake until golden
brown, between 20 and 30 minutes.
Yield: 20-24 muffins.
(You can also bake this batter in small loaf
pans. When doing so, I decrease the oven temperature to 375° and, of course,
extend the baking time.)


